# Build a model
Source: https://capacms.com/docs/modeling/build-a-model
Create a model, add fields and relations, and set it up before your team starts writing.
A model is a content type: Article, Author, Product. This page walks through making one in the admin, from the name to the last field.
You need the Admin or Developer role.
## Plan it first
Once a model has entries, changing a field means converting the values already stored. Before you start, sketch on paper:
* The **models**, one per kind of thing on the site.
* The **fields** each one needs, and which are required.
* The **links** between them: an article has an author, a product has related products.
* Which models hold **one entry** only, such as site settings or a home page.
See [Content model](https://capacms.com/docs/concepts/content-model) for every field type and what the API returns for it.
## Create the model
1. Choose **Models**, then **New model**.
2. Fill in **Unique Model Name**, such as `Article`.
3. Check the **Namespace**. Capa fills it in from the name: `Blog Post` becomes `blog_post`. This is the name your code uses, so keep it short and plain.
4. Optionally pick a category under **Specify Category**, or type a new one.
5. Set the **Model Options** you need.
6. Choose **Create Model**.
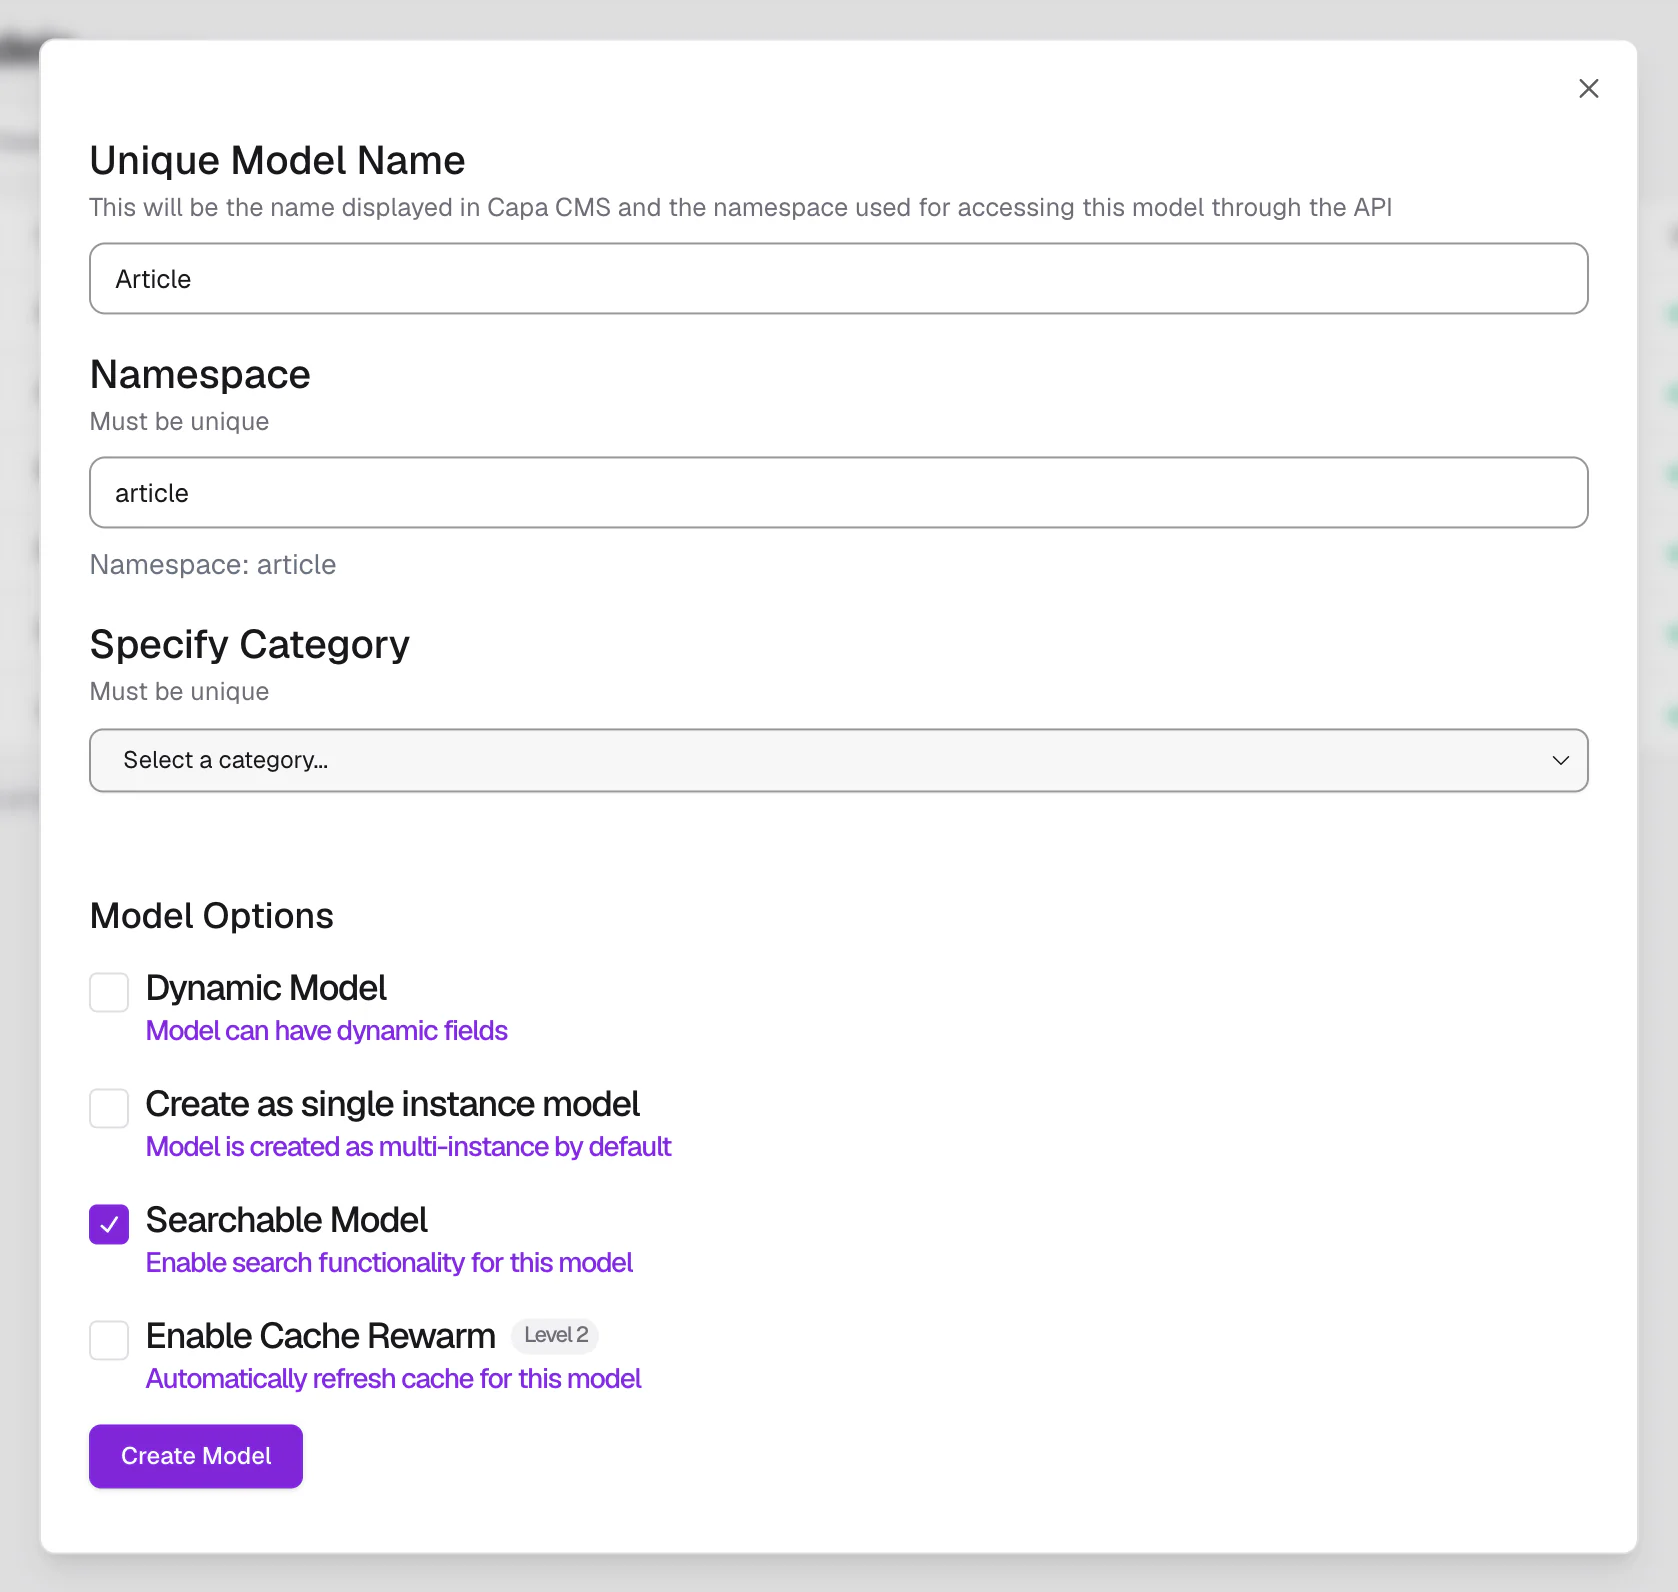
| Option | Turn it on when |
| ----------------------------------- | ----------------------------------------------------------------------------------------------------------------------- |
| **Create as single instance model** | The model holds exactly one entry, such as site settings. |
| **Searchable Model** | Its entries should be indexed for search. On by default. |
| **Dynamic Model** | Entries written through the API may carry keys the model does not declare. Leave it off unless a developer asks for it. |
| **Enable Cache Rewarm** | Capa should refresh this model's cached reads after a publish. Depends on your plan. |
The category and these options can be set only here, when you create the model.
The new model has one field already: a required `title`. It appears on **Models** marked **Draft** until you first save its fields.
## Add fields
1. Open the model's **⋯** menu on **Models** and choose **Edit fields**. The entry editor opens in field-editing mode, showing the model's fields in cards.
2. At the bottom of a card, choose **Add field**, then pick a type.
3. The field's settings open. Set its **Name**. The **Namespace** follows the name until you change it.
4. Choose **Done**.
5. Add the rest of your fields the same way.
6. Choose **Save fields** in the top bar.
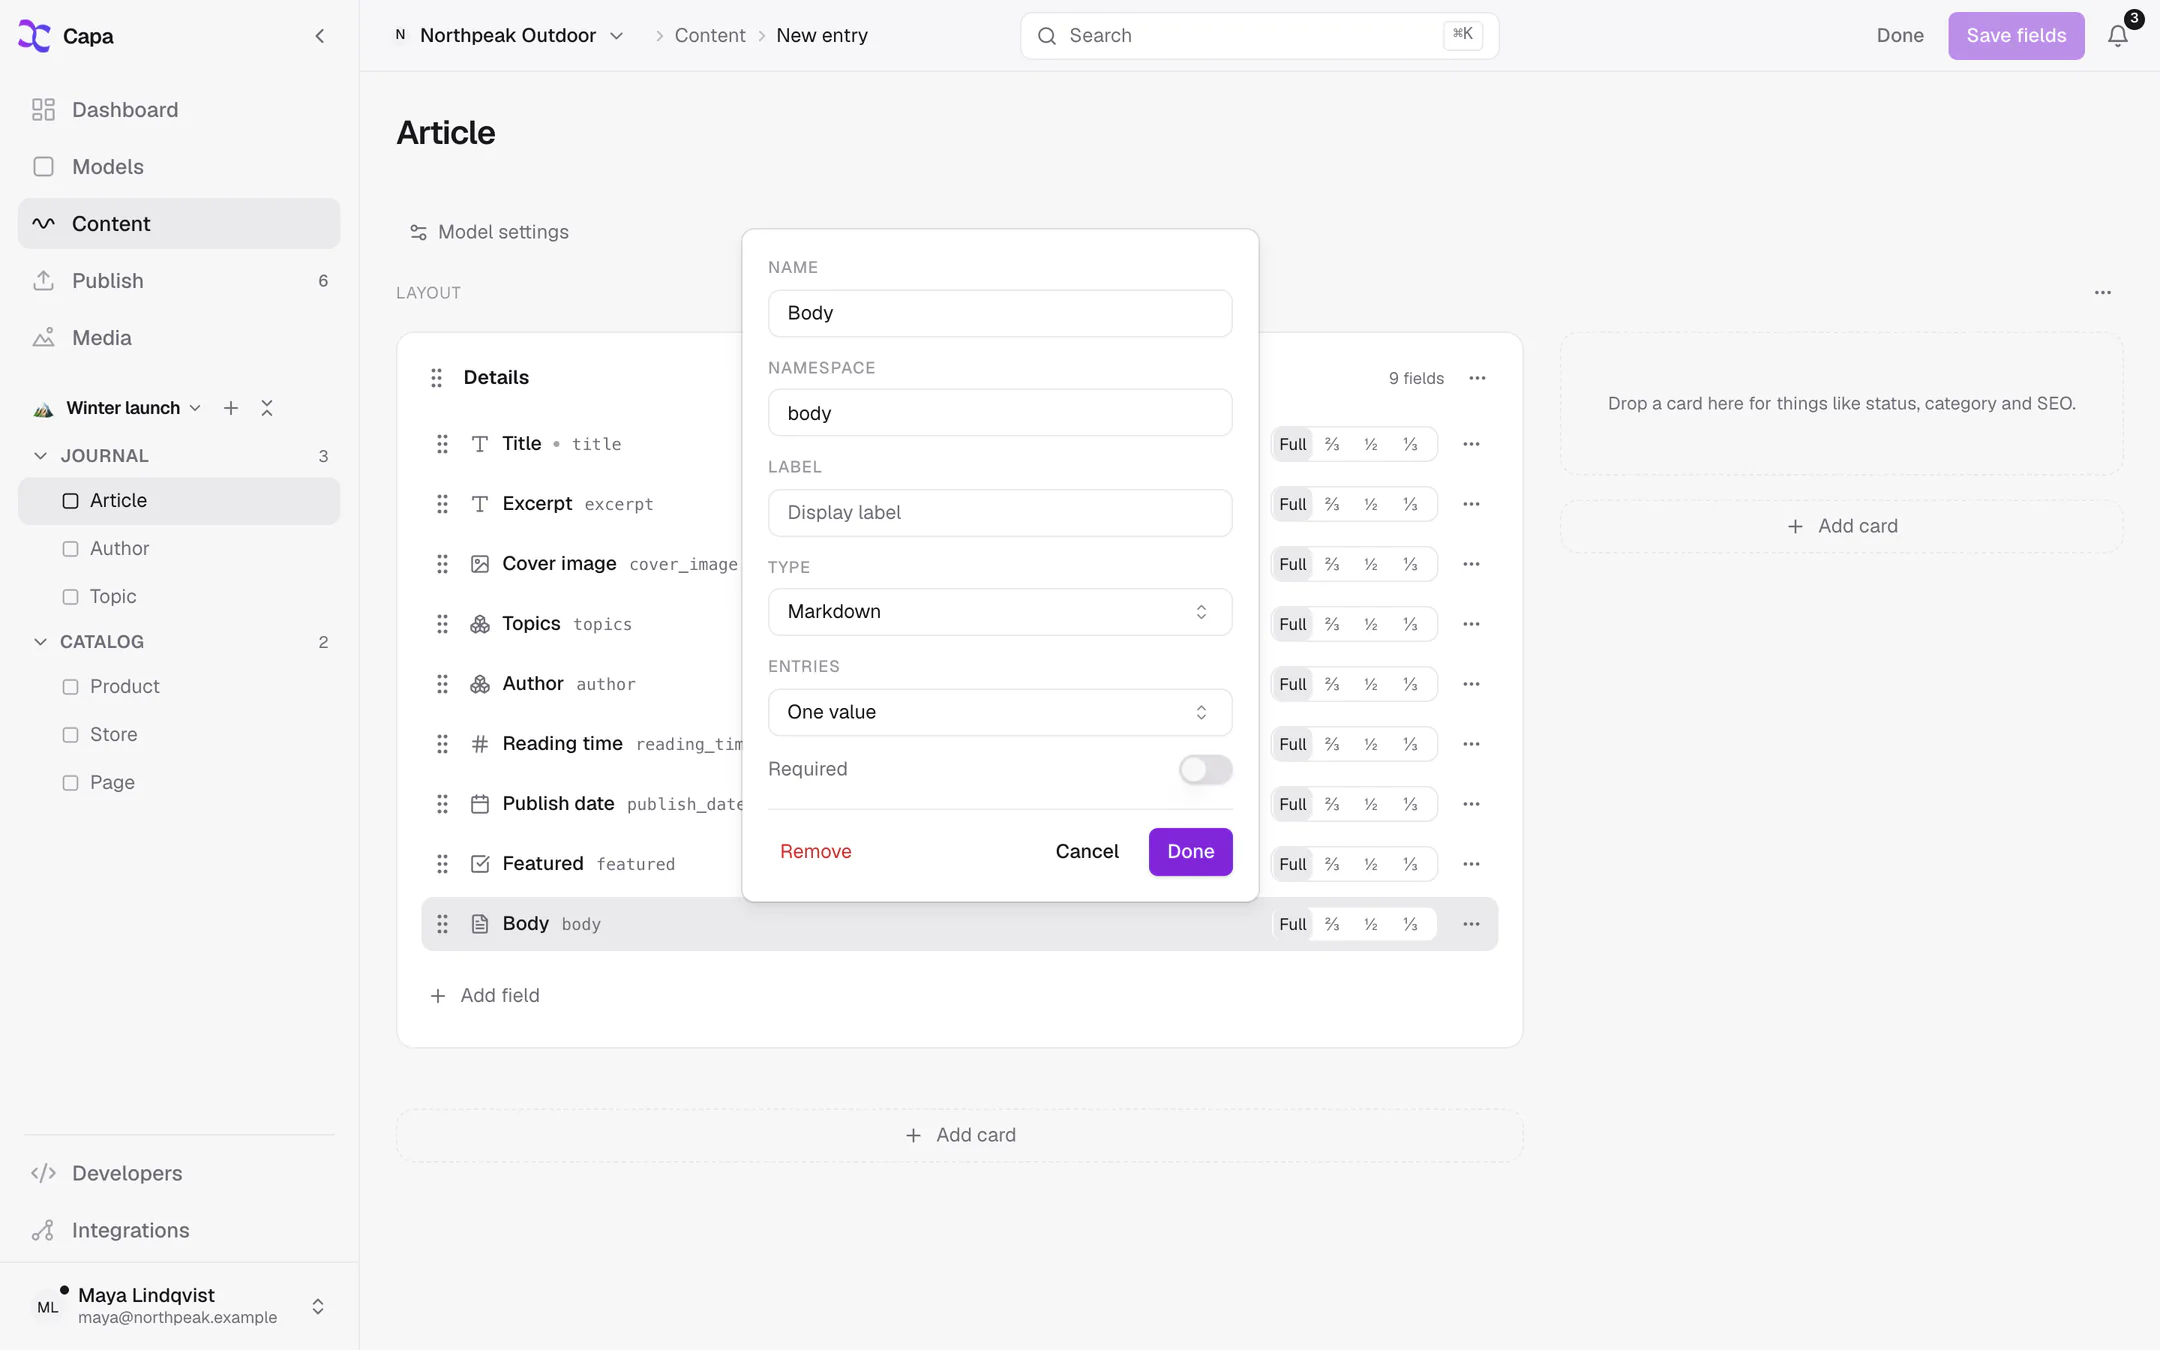
**Nothing is saved until you choose Save fields.** **Done** only closes a field's settings. If you leave with unsaved fields, Capa asks whether to save them.
You can also reach field editing from any entry of the model: press **⌘.** (**Ctrl+.**), or choose **Fields** in the entry's details panel.
### Field settings
| Setting | What it does |
| ----------------- | -------------------------------------------------------------- |
| **Name** | What editors see. |
| **Namespace** | What the API returns the value under. Unique within the model. |
| **Label** | An optional longer label. |
| **Type** | The kind of value. |
| **Entries** | **One value**, or **A list of values**. |
| **List of** | For a list, the type of each item. |
| **Related model** | For a **Model** field, which model it links to. |
| **Options** | For an **Options** field, the choices editors pick from. |
| **Required** | An entry cannot be saved with this field empty. |
There are no unique, default, minimum, maximum or pattern settings.
## Link models together
To give an article an author:
1. Create the `Author` model first.
2. In `Article`, add a field with the **Model** type and name it `Author`.
3. Under **Related model**, choose **Author**.
4. For several authors, set **Entries** to **A list of values**.
5. Choose **Done**, then **Save fields**.
A model can link to itself, for example a page with a parent page.
Editors then pick an author from a list, or create one without leaving the article. To show the author's own fields inside the article form, set the field's **Display** in the [layout builder](https://capacms.com/docs/modeling/layout-builder).
**Store its fields inside this entry** is an older way to embed, which copies values into the entry instead of linking. Prefer a link.
## Arrange the editor
The cards, columns and widths editors see are the model's layout. Set them up in the same field-editing mode. See [Layout builder](https://capacms.com/docs/modeling/layout-builder).
## Model settings
In field-editing mode, choose **Model settings** above the fields to change:
* **Model name**.
* **Namespace**. Your code's reads of the old namespace stop working at once, with `404 model_not_found`.
* **Route** and **Slug field**: the page of your site that shows an entry, such as `/blog/[slug]`. [Preview](https://capacms.com/docs/preview) uses it to open the right page.
* **Pass through into parent forms by default**: models that link to this one show its fields inline, instead of a link.
Choose **Update** to save.
## Categories
Categories group models on the **Models** page. Filter by one with **Category**. To add, rename or delete categories, open that filter and choose **Manage categories**. Deleting a category leaves its models alone.
## Duplicate a model
Choose **Duplicate** in the model's **⋯** menu. The copy is named "Article Copy", with its fields and layout but no entries. Its namespace ends in `_copy_` and a number: change it in **Model settings** before anyone uses it.
## Delete a model
Choose **Delete** in the model's **⋯** menu and confirm.
Deleting a model deletes every entry in it. There is no undo. Reads of its namespace answer
`404 model_not_found`
from then on.
## After your team starts writing
Once a model has entries, adding a field, rearranging the layout, renaming a field and changing **Required** still save at once. Changing a field's type, namespace or related model opens a review first, and so does removing a field. The review shows what happens to the stored values before anything changes. See [Change a field's type](https://capacms.com/docs/modeling/change-field-type).
## Related
* [Content model](https://capacms.com/docs/concepts/content-model): field types and relations.
* [Layout builder](https://capacms.com/docs/modeling/layout-builder): cards, columns and widths.
* [TypeScript](https://capacms.com/docs/guides/typescript): types generated from your models.